Fragmentをスライドイン・スライドアウトさせる
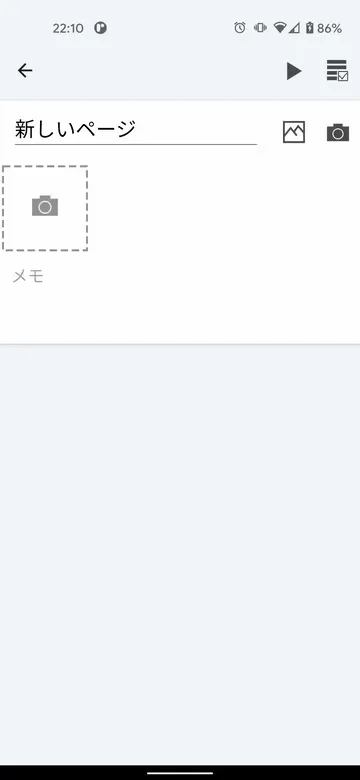
Fragmentを画面の端からスライドインして表示し、スライドアウトで非表示にする方法を紹介します。完成形はこんな感じ。ボタンを押すと下からFragmentの領域がスライドインしてきて、もう一度押すと下にスライドアウトしていきます。
実現したいこと
実現したい仕様は以下のようになります。
- 初期状態ではFragmentは作成しない
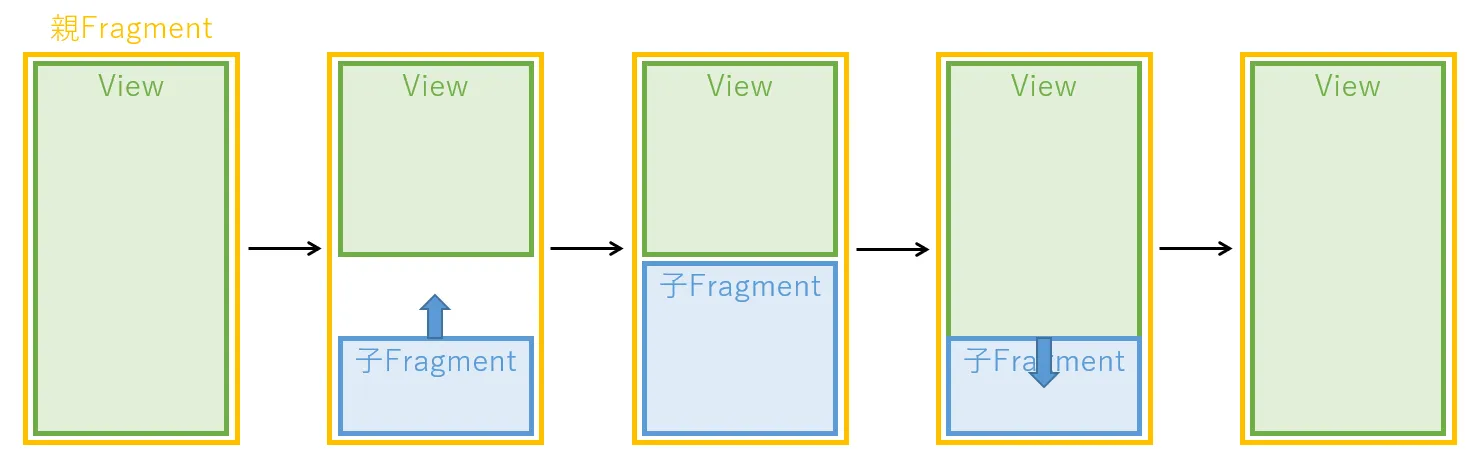
- ボタンを押すと、
- Viewの領域を変形する
- Fragmentを作成し、画面下からスライドインする
- もう一度ボタンを押すと、
- Viewが全画面に戻る
- Fragmentがスライドアウトする
- スライドアウト完了したら、Fragmentを削除する
Fragment非表示中は削除したいというのは、Fragmentにカメラなどを実装する予定のため、使わないときはなるべく無効化してリソースを節約したい、という事情があります。また、Viewを変形させるのは、Fragment表示中にFragmentに隠れた部分が操作できなくなってしまうのを避けるためです。
イメージとしては、ちょうどソフトキーボードを表示が画面の下から出てくるのと同じような感じになります。
Viewの構成
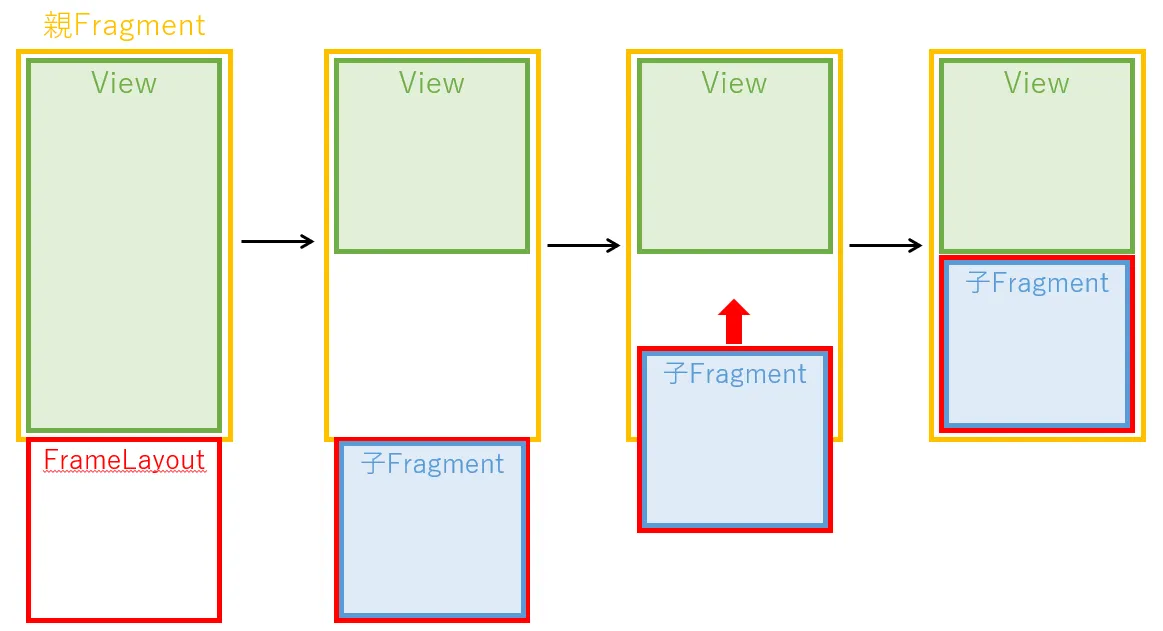
実際には子FragmentはFrameLayout(以下ではFragmentContainerと呼びます)の上に配置します。そしてポイントは、初期状態でFragmentContainerを親Fragmentの表示領域外に配置しておくことです。Fragment表示時は、まずFragmentContainerに子Fragmentを配置し、それからアニメーションでFragmentContainerごとスライドさせます。
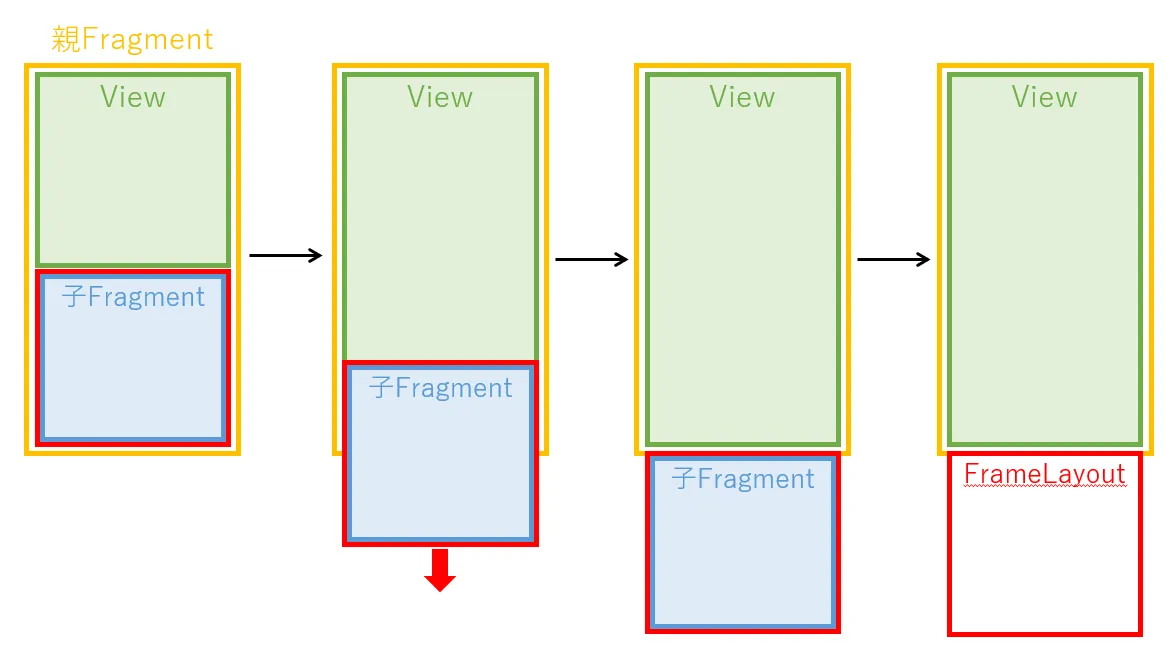
逆に非表示時は、FragmentContainerをアニメーションでスライドアウトさせ、画面の外に移動してから子Fragmentを削除します。
緑のViewのサイズ変更は、アニメーション開始時に行います。アニメーション終了時にサイズ変更するよりも、画面遷移がドタバタして見えないのでそうしています。場合によっては緑のViewも、FragmentContainerとタイミングを合わせてアニメーションしてもよいと思いますが、今回はViewの部分にRecyclerViewを使っており、レンダリングの負荷が高くなりそうに思えたのでアニメーションは避けました。
ソースコード
ではソースコードを見ていきます。
レイアウトXMLは初期状態のFragmentContainerが画面表示領域外にある状態で定義しています。また、Viewの下端はFrameLayoutの上端に固定しています。これにより、FrameLayout(FragmentContainer)を移動すると、Viewも連動して移動してくれます。
ちなみに今回は子Fragmentの形が正方形と決まっていたので、FrameLayoutのlayout_constraintDimensionRatioに1を指定していますが、普通に高さを指定したりwrap_contentでも問題ないと思います。
<androidx.constraintlayout.widget.ConstraintLayout    android:layout_width="match_parent"    android:layout_height="match_parent"    android:id="@+id/rootLayout">
    <View        android:layout_width="0dp"        android:layout_height="0dp"        app:layout_constraintBottom_toTopOf="@+id/bottomFragmentContainer"        app:layout_constraintEnd_toEndOf="parent"        app:layout_constraintStart_toStartOf="parent"        app:layout_constraintTop_toTopOf="parent" />
    <FrameLayout        android:id="@+id/bottomFragmentContainer"        android:layout_width="0dp"        android:layout_height="0dp"        app:layout_constraintDimensionRatio="1"        app:layout_constraintEnd_toEndOf="parent"        app:layout_constraintStart_toStartOf="parent"        app:layout_constraintTop_toBottomOf="parent" />
</androidx.constraintlayout.widget.ConstraintLayout>スライドイン表示のソースコードは以下の通りです。初めにFragmentContainerの下端が画面の下端になるように配置を変更します。次にフラグメントを表示します。FragmentTransactionのアニメーション機能は使用していません。そして最後に、アニメーションを設定します。アニメーションにはObjectAnimatorを使います。縦方向の移動なので、translationYを変化させます。この時点でFragmentContainerはすでに画面内に配置されているので、画面外からスライドインさせるために、FragmentContainer自体の高さを初期値に指定し、目標値に0を指定します。
fun slideInFromBottom(fragment: Fragment) {
    /* bottomFragmentContainerのBOTTOMをrootLayoutのBOTTOMに合わせる */    ConstraintSet().apply {        clone(binding.rootLayout)        clear(R.id.bottomFragmentContainer, ConstraintSet.TOP)        connect(R.id.bottomFragmentContainer, ConstraintSet.BOTTOM, R.id.rootLayout, ConstraintSet.BOTTOM)        applyTo(binding.rootLayout)    }
    /* フラグメントを表示 */    childFragmentManager.beginTransaction()        .add(R.id.bottomFragmentContainer, fragment)        .commit()
/* スライドインアニメーション */ ObjectAnimator.ofFloat( binding.bottomFragmentContainer, "translationY", binding.bottomFragmentContainer.measuredHeight.toFloat(), 0f ).apply { duration = 150 start() }}次はスライドアウトのソースコードです。基本的にはスライドインと反対のことをするのですが、Fragmentの削除をアニメーション終了時に行う必要があるので、AnimationListenerAdapterのonAnimationEnd()にFragmentの削除を記述し、ObjectAnimator.addListener()でリスナーを設定しています。
fun slideOutToBottom(fragment: Fragment) {
    /* bottomFragmentContainerのTOPをrootLayoutのBOTTOMに合わせる */    ConstraintSet().apply {        clone(binding.rootLayout)        clear(R.id.bottomFragmentContainer, ConstraintSet.BOTTOM)        connect(R.id.bottomFragmentContainer, ConstraintSet.TOP, R.id.rootLayout, ConstraintSet.BOTTOM)        applyTo(binding.rootLayout)    }
    /* アニメーションイベントリスナー。アニメーション終了したらフラグメントを削除 */    val listener = object: AnimatorListenerAdapter() {        override fun onAnimationEnd(animation: Animator?) {            childFragmentManager.beginTransaction().remove(fragment).commit()        }    }
    /* スライドアウトアニメーション */    ObjectAnimator.ofFloat(        binding.bottomFragmentContainer, "translationY",        -binding.bottomFragmentContainer.measuredHeight.toFloat(), 0f    ).apply {        duration = 150        addListener(listener)        start()    }}
まとめ
以上で、Fragmentのスライドイン・スライドアウトを実現できました。アニメーションにObjectAnimatorを使うこと、初期状態でFragmentContainerを画面外に配置しておくこと、onAnimationEndでFragmentを削除すること、がポイントだと思います。
おまけ。FragmentTransactionのsetCustomAnimationsを使わなかった理由
Fragment表示・非表示時のアニメーションというと、FragmentTransactionのsetCustomAnimations()が最初に思いつきましたが、これはうまくいきませんでした。表示時(enter)アニメーションはうまくいくのですが、非表示時(exit)アニメーションが動作しませんでした。理由は、remove()してcommit()した時点でFragmentがView階層から無くなっているので、アニメーションが実行されないようでした。これに対してダミーのFragmentを常に表示しておくという方法も紹介されていたりはしますが、あまりスマートではないと感じたので、今回は上記のようなプロパティアニメーションを使う方法で実装してみました。